By using action Excel in Power Automate (formerly known as Microsoft Flow), you'll typically want to automate tasks involving Excel files, such as creating, updating, or reading data from spreadsheets
First you have to sign in to Power Automate desktop for downloading PAD click here Then from actions under excel you have to click on "Launch Excel" action.

Launch Excel in Power Automate
After clicking on above launch excel icon another window will be opened as shown below.It has already selected launch excel with blank document.Click on save and run.A blank excel file will be launched.

Launch Excel with blank Document
To open any specific document you have to select open the following document in place of blank document and provide the path of the file and click on save and then run.It will automatically launch the specified file.
Variable Produced in Launch Excel in Power Automate:
The output of all power automate actions will be stored in excel instance.we can also rename with the specific excel name to use it further.

Variable Produced in Launch Excel in Power automate
Open as Read only in Launch Excel in Power automate:
Open as read only appears in launch excel when you open file by specifyingdocument path.It opens given file as read only when on.
2.Read from excel worksheet Action:
After launching excel next task is to read values from excel file.To read values from given file click on "Read from excel worksheet icon" in actions.A pop up will appear as shown in below image

InExcel instance section %excelinstance% is variable produced by launch excel action or simply it is the file that we have launched in launch excel action.
In retrieve you can retrieve data by 5
In start column need to mention column name A,B,C etc
In start row need to mention row numbers 1,2,3 etc
3.Attach to running Excel:
With the help of action attach to running excel we can attach or work with already opened excel notebook in our flow.It will automatically display opened excel file name in document name field if no excel file is opened it display none.
We can see below as 'Book1' file is opened in system it is displaying file name in document name section

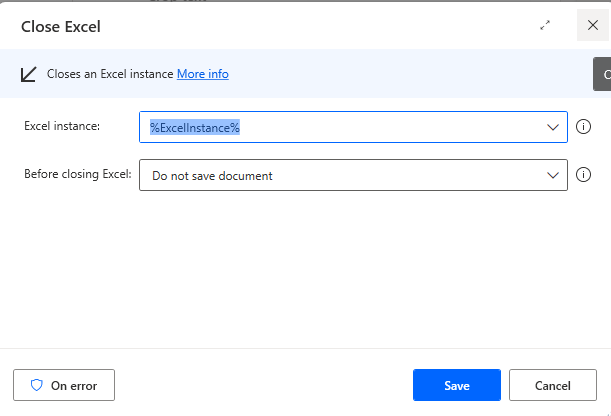
4.Close Excel:
Close Excel Action in power automate will close opened excel file.we need to specify excel instance that need to close.excel instance must be specified previously and in Before closing excel we need to specify whether and how to save the document of this instance before closing that instance.we can select from 3 option from drop down.
- Do not save Document-It will not make any change in documents.
- Save Document -It will save document with changes being done after opening excel instance.
- Save document as-It will as k form path of the file and extension of the file you want to save.
5.Write to Excel Worksheet:
It is used to write a value in excel cell.We can specify excel instance ,
Value to write-It is the value we want to write in excel cell.
Write mode-On specified cell we have to specified cell value such as B2,B3,A4 etc,On currently active cell it will automatically paste values in currently active cell.
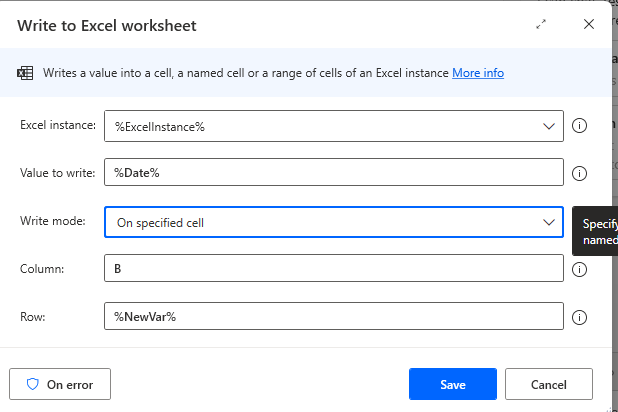
It is very useful action used to work with excel in power automate.
6.Look up range in excel worksheet
Power Automate Desktop includes a Lookup range in Excel worksheet action that allows you to search for specific values or ranges. It is similar to lookup formula in excel.
In Power Automate to look up a value first
- We have to define excel instance.
- Then in next row look up value which we want to look up after that
- Ranges format specific range or Name cells. let’s Select specific ranges for now.
- In Start column , we must write column name A, B, C etc.
- In Start row , we must write row index or value.
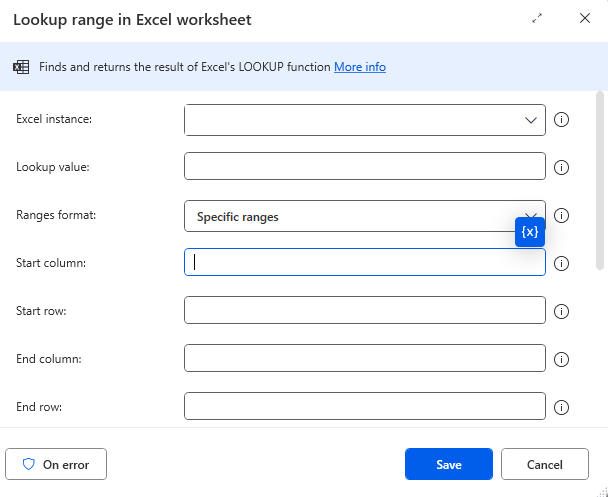
- In end row section we have to write the last row index of the range from which the matching value is to be returned.
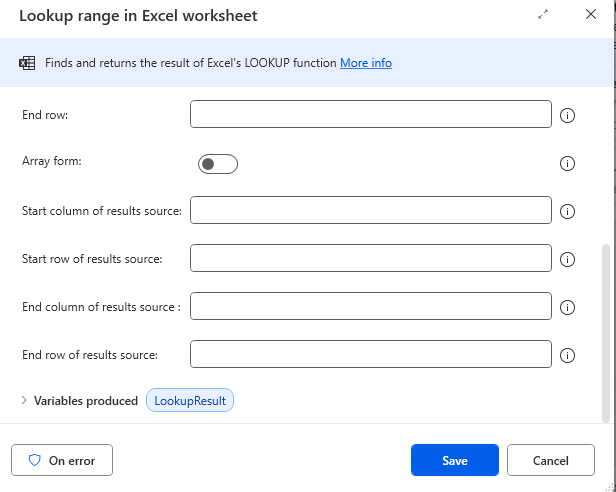
- In the start column of results source& end column of results source we must write letters (A,B,C etc.) or index of the column from which the matching value is returned.
- In the start row of results source& start row of results source we have to write letter or index of the column from which the matching value is returned.
It will produce variable Lookup results as output.
7.Find and replace cells in Excel worksheet
For getting column and row index we have to use Find and replace cells in Excel worksheet action in excel in power automate before Look up range in excel worksheet.
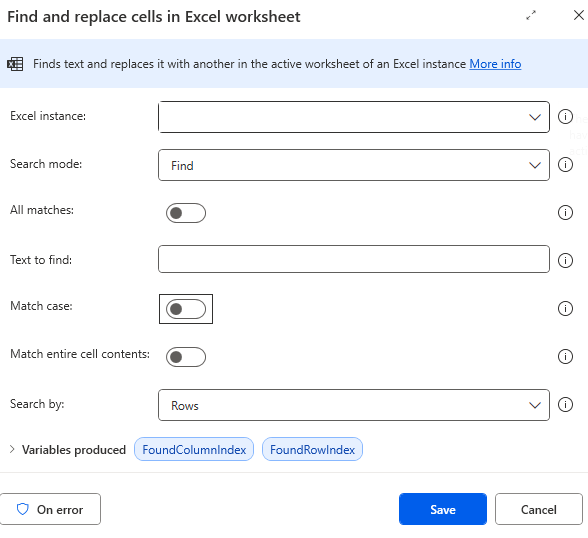
- Excel instance: Use the variable from the Launch Excel step.
- Search mode: Choose Find or Find and Replace.
- Text to find: Enter the text to find in work sheet.
- Text to replace with: If we select find and replace in above section then enter the new text.
- Match case: ON when to search for case sensitive data.
- Match entire cell contents: ON if the match must be exact.
- Search by: Choose Columns or Rows the order in which we have to search for text.
It will produce variable Column index and row index as output. These Column index and row index we can use in lookup value in Excel worksheet action in power automaton in start row and end row column.It is very useful in excel in power automate